

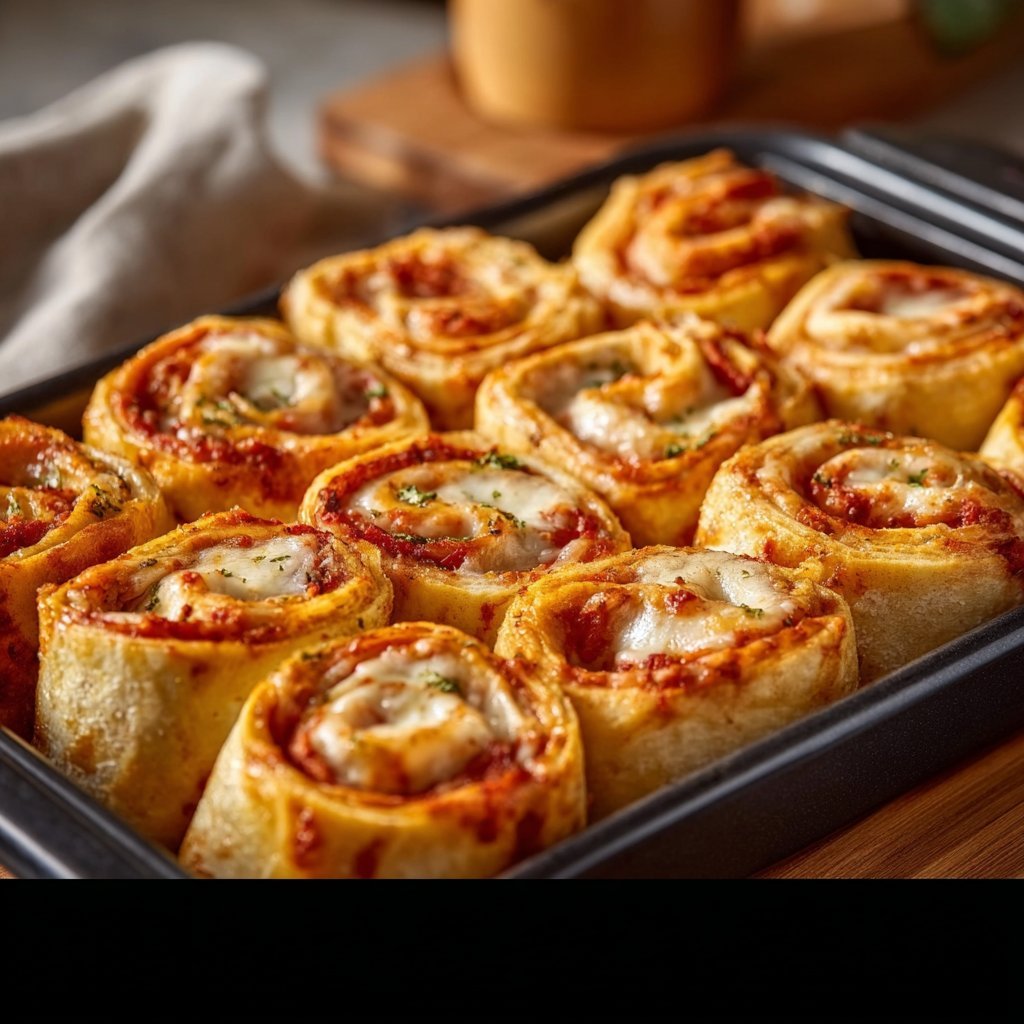
There’s something magical about the aroma of freshly baked pizza wafting through the kitchen. It wraps you in a warm embrace, signaling that dinner is not just a meal but a delightful experience. Enter Delicious Pizza Roll-Ups, where the flavors and textures of pizza come together in a fun, easy-to-eat format perfect for both weeknight dinners and gatherings. Imagine golden, crispy rolls with melted cheese oozing from the edges, mixed with savory pepperoni and a hint of herb-infused tomato sauce—your family will adore them! These bite-sized treats are not just visually appealing; they also deliver a taste sensation that has everyone coming back for seconds. Gather your loved ones and prepare to create a dish that will soon become a staple on your table!
Understanding Delicious Pizza Roll-Ups
Delicious Pizza Roll-Ups combine the beloved elements of traditional pizza in a new, exciting way. This dish draws from the Italian tradition of rolled breads, but it’s uniquely American, incorporating our love for convenience and bold flavors. Originating as a crowd-favorite party snack, these roll-ups have become a household go-to, especially with the rise of easy cooking methods such as the air fryer and slow cooker. The versatility in preparation allows for beautifully crispy exteriors while keeping the insides gooey and warm—a combination that’s simply irresistible.
One of the great things about Pizza Roll-Ups is how easily you can adapt them to suit your taste or dietary needs. Whether you’re using an air fryer for a quick crisp or a slow cooker for a hot and melty option, the flavor penetrates deep into every layer, enhancing your pizza experience. They are typically served warm, making them perfect for casual family dinners, parties, or movie nights. Did you know they can also be made ahead of time and then simply popped in the oven or air fryer when guests arrive? It’s one of those fun facts that makes them even more appealing when planning your next gathering.
Why You’ll Love This Recipe
Delicious Pizza Roll-Ups are a delightful combination of simplicity and flavor, making them a hit with both adults and kids alike.
- Ease of Preparation: With minimal prep work and straightforward instructions, even novice cooks can whip up these tasty bites without a hitch.
- Flavor Complexity: The mix of melty cheese, savory meats, and zesty seasonings creates layers of flavor that tantalize the taste buds.
- Family-Friendly or Kid-Approved: Kids adore helping to assemble the rolls, making it a fun family activity; plus, they’re easy to customize to suit picky eaters!
- Budget-Friendly or Ingredient Flexibility: Using simple ingredients, you can easily swap in whatever you have on hand—think vegetables, different cheeses, or even a variety of sauces.
How to Make Delicious Pizza Roll-Ups
Prepare yourself for a culinary adventure that’s both fulfilling and fun! Making Delicious Pizza Roll-Ups is a straightforward process that requires just a few tools and ingredients.
Quick Overview
This easy recipe takes about 30 minutes from start to finish, and you’ll need a baking sheet, parchment paper, and perhaps an air fryer if you desire that extra crispy finish. Let’s dive into the ingredients and the step-by-step process that will have your kitchen humming with delicious smells in no time!
Ingredients
- Pizza Dough: Provides the soft, chewy base; you can use store-bought or homemade.
- Mozzarella Cheese: The star of the show that melts beautifully; feel free to experiment with blends for added flavor.
- Pepperoni or Toppings of Choice: Customize with your favorites—think sausage, mushrooms, or bell peppers.
- Pizza Sauce: Adds moistness and flavor; consider marinara or even pesto for a twist.
- Seasonings (Italian herbs, garlic powder): Enhances the taste, giving that classic pizzeria vibe.
- Olive Oil: Used for brushing on top for a golden, crispy finish.
Directions
- Preheat the Oven: Preheat your oven to 400°F (200°C) to ensure the roll-ups bake evenly and become crispy.
- Roll Out the Dough: On a floured surface, roll out your pizza dough until it’s about 1/4 inch thick. It should resemble a rectangle; this is your canvas!
- Add Sauce and Cheese: Spread an even layer of pizza sauce over the dough, leaving a little margin on the edges. Sprinkle a generous layer of mozzarella cheese on top.
- Layer Toppings: Add your pepperoni or other chosen toppings, and sprinkle on any additional seasonings for that authentic flavor.
- Roll it Up: Start at one end and gently roll the dough into a log, using your fingers to tuck the filling in as you roll. Seal the edges by pinching them closed.
- Slice and Arrange: Cut the log into 1-inch pieces (about 8-10) and place them on a parchment-lined baking sheet. Brush the tops with olive oil for a golden finish.
- Bake: Slide the roll-ups into the oven and bake for about 15-20 minutes or until golden brown and the cheese is bubbling.
Delicious Pairings for Pizza Roll-Ups
These scrumptious roll-ups can serve as a delightful main course or a finger food appetizer. For a well-rounded meal, consider pairing them with a crisp salad drizzled with a tangy vinaigrette, which contrasts beautifully with the richness of the cheese. A homemade marinara or ranch dipping sauce elevates the experience further, inviting guests to indulge in their personal flavor preferences. And of course, a refreshing fruit smoothie or soda adds a festive touch, complementing the savory notes of the roll-ups perfectly!
Pro Tips for the Best Pizza Roll-Ups
To achieve roll-up perfection, technique matters!
- Ingredient Swaps or Upgrades: Swap out mozzarella for fontina or provolone for a richer flavor profile, or add fresh basil for a burst of freshness.
- Spice Adjustments: Consider adding crushed red pepper for a little heat or a sprinkle of garlic powder for enhanced flavor.
- Equipment Advice: If using an air fryer, reduce the baking time to about 10-12 minutes for quicker results.
- Storage Tips: Cool leftover roll-ups completely before storing them in an airtight container in the fridge; they will keep for up to three days.
- Mistakes to Avoid: Ensure not to overload the filling or the roll-ups may burst open while baking. Less is often more!
Variations & Add-Ins
Fancy a twist on the classic?
- Vegetarian Option: Replace pepperoni with sautéed veggies such as spinach, mushrooms, and bell peppers.
- Buffalo Chicken Roll-Ups: Fill with shredded chicken tossed in buffalo sauce and cream cheese for a spicy, creamy delight.
- Dessert Roll-Ups: Use cinnamon sugar, chocolate chips, and marshmallows inside for a sweet treat your kids will love!
Kid-Friendly Version
To cater to younger palates, keep toppings simple. Classic cheese and pepperoni work best, but consider using smaller, bite-sized pieces of toppings for easier handling. Parents can even customize shapes by using cookie cutters to create fun forms that are more appealing to children. The visual presentation can make a huge difference—think smiley faces made out of olives or fun shapes!
Storing and Reheating Tips
Leftover Delicious Pizza Roll-Ups can be stored effortlessly. Allow them to cool to room temperature, then place them in an airtight container. Enjoy them within three days to experience the best flavor and texture. If you can’t finish them, feel free to freeze them; they can last up to three months! Just make sure to layer them between parchment paper to prevent sticking.
When it comes to reheating, the oven or air fryer are your best friends. For oven reheating, place them on a baking sheet at 350°F (175°C) for about 10-15 minutes until heated through. The air fryer is even better, taking only 5-8 minutes to restore their crispy edges. Alternatively, you can microwave them, but know that the texture may not be as delightful.
FAQs
Can I prep these roll-ups ahead of time?
Absolutely! You can assemble the roll-ups the night before, cover them with plastic wrap, and store them in the fridge until you’re ready to bake them.
What can I substitute if I don’t have pizza sauce?
You can use marinara, alfredo sauce, or even a flavorful pesto for a different twist. Each will add its unique flavor to your roll-ups.
Are there gluten-free options for the dough?
Yes! Many grocery stores offer gluten-free pizza dough options or you can make your own with gluten-free flour mixtures.
How long can I store leftover roll-ups?
In the refrigerator, they’ll comfortably last for 3 days, while in the freezer, they can maintain quality for about three months.
Can I make these vegetarian?
Certainly! Feel free to load them up with your favorite fresh vegetables instead of meat to create a delicious vegetarian option.
Conclusion
Delicious Pizza Roll-Ups are not just easy to make but also a joy to eat, making them an instant family favorite. Their customizable nature allows everyone to craft their personalized pizza experience, ensuring satisfaction all around. Gather the family, roll with creativity, and dive into a culinary delight that will have your taste buds dancing. Try it tonight and let me know how it turned out!
Delicious Pizza Roll-Ups

A fun and easy-to-eat twist on traditional pizza, perfect for family dinners or gatherings.
- Prep Time: 15 minutes
- Cook Time: 20 minutes
- Total Time: 35 minutes
- Yield: 4 servings
- Category: Appetizer
- Method: Baking
- Cuisine: Italian-American
- Diet: Vegetarian
Ingredients
- Pizza Dough
- Mozzarella Cheese
- Pepperoni or Toppings of Choice
- Pizza Sauce
- Italian herbs and garlic powder
- Olive Oil
Instructions
- Preheat your oven to 400°F (200°C).
- Roll out the pizza dough on a floured surface to about 1/4 inch thick.
- Spread pizza sauce over the dough, leaving a margin on the edges.
- Sprinkle mozzarella cheese on top.
- Add pepperoni or preferred toppings, then sprinkle with seasonings.
- Roll the dough into a log, tucking in the filling as you go.
- Cut the log into 1-inch pieces and place on a parchment-lined baking sheet.
- Brush the tops with olive oil.
- Bake for 15-20 minutes or until golden brown and cheese is bubbling.
Notes
These roll-ups can be customized with various toppings and sauces, making them versatile for any preference.
Nutrition
- Serving Size: 1 roll-up
- Calories: 250
- Sugar: 2g
- Sodium: 450mg
- Fat: 10g
- Saturated Fat: 4g
- Unsaturated Fat: 5g
- Trans Fat: 0g
- Carbohydrates: 30g
- Fiber: 2g
- Protein: 10g
- Cholesterol: 20mg