

The Ultimate Comfort Food: Garlic Parmesan Cheeseburger Bombs
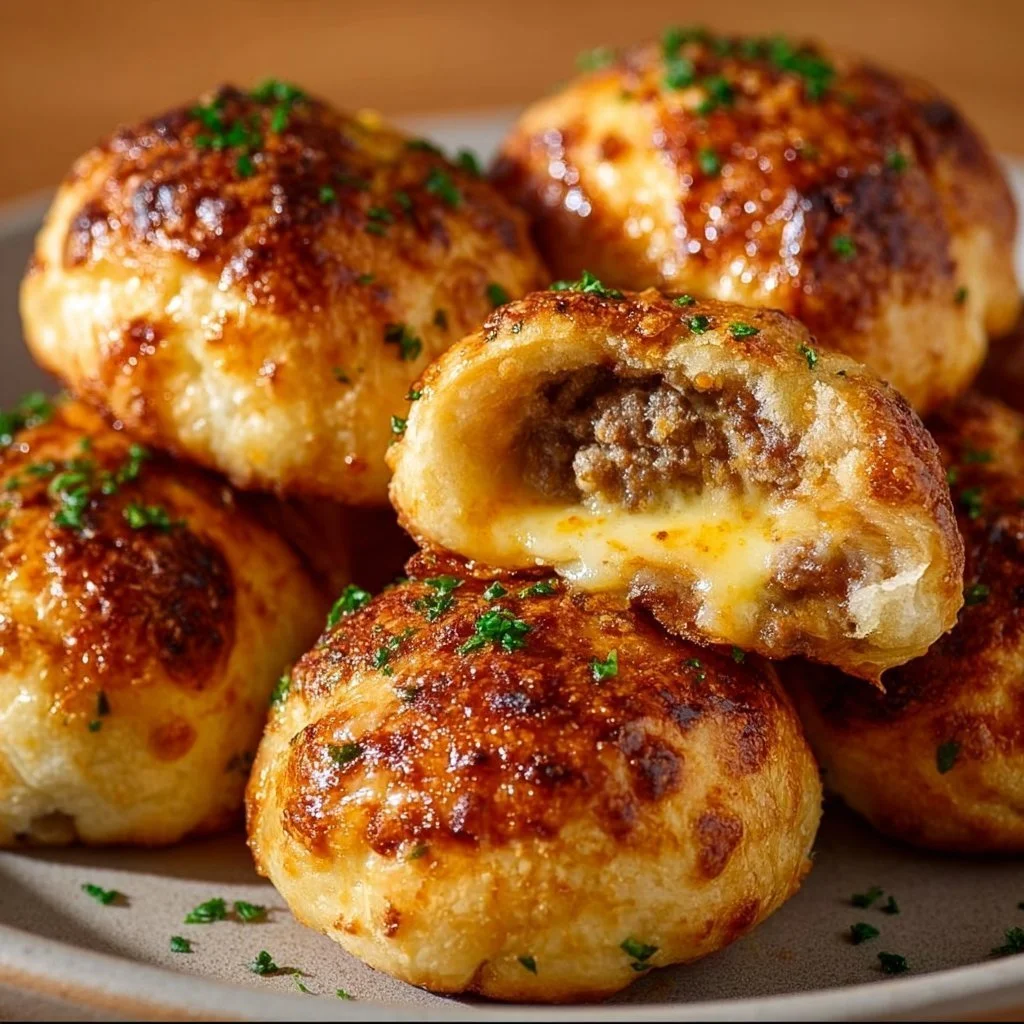
There’s something magical about the aroma of garlic and cheese wafting through your kitchen, especially when you’re preparing a dish as comforting and delightful as Garlic Parmesan Cheeseburger Bombs. These little bundles of joy are not only bursting with flavor but are incredibly easy to make, making them perfect for those busy weeknights or spontaneous gatherings with family and friends. Just imagine biting into a soft, pillowy dough filled with juicy burger meat, gooey cheese, and punctuated by the fragrant kick of garlic and the rich flavor of Parmesan. The golden-brown exterior invites you in, while the savory, melty filling takes you straight to flavor heaven.
You’re not just making a meal; you’re creating an experience. Whether as a football night appetizer or a main dish served with a side salad, Garlic Parmesan Cheeseburger Bombs are sure to impress everyone at the table. With such vibrant colors and tantalizing aroma, they would steal the spotlight at any gathering or family dinner. So come join me as we delve into this delightful recipe that promises to satisfy every taste bud.
Understanding This Recipe
Garlic Parmesan Cheeseburger Bombs are a fun twist on traditional cheeseburgers, originating from the culinary creativity that combines comfort food favorites into a single, tasty bite. They encapsulate all the comforting elements of a classic cheeseburger, including seasoned ground beef, cheese, and savory garlic, all wrapped in a soft dough. This dish is versatile and can be served as an appetizer, a main course, or even as party snacks, beautifully catering to a range of social settings.
The method of preparation usually includes baking, but this dish can also be adapted for slow cooking or air frying, amplifying the depth of flavor while keeping the process straightforward. The uniform dough allows the interior flavors to meld beautifully, giving every bite a harmonious taste of cheeseburger goodness. It’s typically served hot, right from the oven, with a side of dipping sauce like tangy ketchup or spicy mustard, enhancing the overall culinary experience. What’s more, these bombshells are super easy to make, and I promise, they’ll leave your guests raving.
Why You’ll Love This Recipe
There are plenty of reasons to add Garlic Parmesan Cheeseburger Bombs to your recipe repertoire.
-
Ease of Preparation: This dish doesn’t require advanced cooking skills, making it approachable for cooks of all skill levels. You can whip these up even on a busy weeknight, making dinner time much easier.
-
Flavor Complexity: Each bite offers a burst of flavors with the richness of ground beef, the creaminess of melted cheese, and the punchy notes of garlic and Parmesan. The combination creates a satisfying taste experience.
-
Family-Friendly: This recipe is a hit among kids and adults alike. The delightful bite-sized nature excites young eaters, while parents will appreciate the wholesome ingredients.
-
Budget-Friendly: Made from easily accessible ingredients, you can even modify components based on what you have on hand, keeping your wallet happy.
-
Versatile: You can customize the ingredients based on your family’s preferences, experimenting with different cheeses or adding veggies to the filling, ensuring everyone enjoys their meal.
Let’s Cook Garlic Parmesan Cheeseburger Bombs at Home
Creating Garlic Parmesan Cheeseburger Bombs is a straightforward process that’s fun for the whole family. You’ll need basic kitchen tools like a mixing bowl, baking tray, and oven, which make the whole preparation extremely manageable. In just about 40 minutes, you’ll be indulging in the delightful flavors of these savory bombs.
Ingredients
- 1 lb ground beef: Provides the meaty filling; feel free to use turkey or plant-based alternatives for a lighter or vegetarian option.
- 1 cup shredded cheddar cheese: Melts beautifully and adds that classic cheeseburger taste.
- 1 tbsp minced garlic: Infuses a wonderful aroma and flavor.
- 1 tbsp Parmesan cheese: Adds richness and a salty kick.
- 1 can (16 oz) of crescent roll dough: Forms the outer layer; you can swap it with puff pastry for a different texture.
- Salt and pepper to taste: Essential for seasoning the beef.
- Optional dipping sauces: Ketchup or mustard for serving.
Directions
-
Preheat the oven: Begin by preheating your oven to 375°F (190°C). This will ensure that your bombs cook evenly and brown beautifully.
-
Cook the beef: In a skillet over medium heat, add the ground beef along with minced garlic. Cook until the beef is browned; this should take about 6–8 minutes. Make sure to season with salt and pepper while cooking for optimal flavor.
-
Mix in the cheese: Remove the skillet from heat and stir in shredded cheddar and Parmesan, allowing the cheeses to melt slightly into the beef mixture. This will create a deliciously gooey center.
-
Prepare the dough: Roll out your crescent roll dough on a lightly floured surface. Separate it into triangles according to the package instructions.
-
Form the bombs: Place a tablespoon of the beef and cheese mixture into the center of each triangle. Fold the dough over the filling, pinching the edges to seal securely.
-
Bake: Arrange the filled bombs on a baking tray lined with parchment paper. Bake in your preheated oven for about 12-15 minutes, or until golden brown and puffed up.
-
Serve them hot: Remove from the oven and let cool for 2-3 minutes before serving. Serve with your choice of dipping sauce for added flavor.
What to Serve With Garlic Parmesan Cheeseburger Bombs
These delicious Garlic Parmesan Cheeseburger Bombs can stand alone as a satisfying meal, but they also pair well with various side dishes that can elevate your dining experience.
-
Crispy Fries: Classic homemade or frozen fries provide a crunchy contrast that goes perfectly with these soft bombs, enhancing the experience.
-
Fresh Salad: A light side salad with a tangy vinaigrette adds a refreshing note that balances out the richness of the bombs, offering a satisfying meal.
-
Vegetable Platter: Served with hummus or ranch dip, vegetables add a colorful and crunchy element to your table, complementing the meal beautifully.
Adding a light beer or a creamy soda can round out your meal while creating a relaxed atmosphere for you and your guests—all contributing to an enjoyable dining experience.
Top Tips for Perfecting Garlic Parmesan Cheeseburger Bombs
To ensure your Chicken Parmesan Cheeseburger Bombs turn out perfectly every time, consider these expert tips.
-
Dough Options: If you want a flakier texture, try using puff pastry instead of crescent roll dough for a unique twist.
-
Flavor Add-Ins: Feel free to jazz up your filling with diced onions, bell peppers, or even jalapeños for added flavor and texture.
-
Kitchen Tools: A silicone baking mat or parchment paper helps for easy cleanup and prevents sticking, ensuring that your bombs come out intact.
-
Storage Tips: Leftovers can be kept in an airtight container in the fridge for up to three days, perfect for meal prep.
-
Common Mistakes: Ensure the filling is not too wet, as excess moisture may cause the bombs to become soggy instead of crispy.
Variations & Add-Ins
-
Buffalo Cheeseburger Bombs: Mix in buffalo sauce with the beef before filling, adding a spicy kick that pairs beautifully with blue cheese crumbles.
-
Mediterranean Option: Swap the cheeses for feta and add spinach or sun-dried tomatoes to the beef for a unique spin on the traditional flavors.
-
Veggie Bombs: For a meat-free option, fill the bombs with a mixture of sautéed mushrooms, spinach, and cheese, perfect for vegetarians.
These options allow your Garlic Parmesan Cheeseburger Bombs to suit various tastes and dietary preferences, making them even more versatile.
Kid-Friendly Version
To make Garlic Parmesan Cheeseburger Bombs more appealing to children, consider reducing the amount of garlic and seasoning to suit sensitive palates. You might want to use milder cheeses like mozzarella, which melts beautifully and has a familiar flavor. Shaping the bombs into fun forms or even half-moons can turn the dish into an exciting mealtime adventure, ensuring that kids are eagerly reaching for these tasty treats.
Storing and Reheating Tips
These Garlic Parmesan Cheeseburger Bombs can be stored in an airtight container and kept in the refrigerator for up to three days. Ensure they’re cooled down before placing them in the container to avoid condensation. If you have leftovers, make sure you reheat them properly so they retain their delightful texture.
On the stovetop, you can heat them gently on low to avoid overcooking. Alternatively, using an air fryer or oven can ensure a crispy exterior while warming the filling thoroughly. If you wish to freeze them, wrap the cooled bombs tightly in plastic wrap and store in a freezer bag for up to two months. When needed, simply thaw in the refrigerator overnight before reheating.
FAQs
Can I prepare Garlic Parmesan Cheeseburger Bombs ahead of time?
Absolutely! You can fill the dough in advance and store them in the refrigerator until you’re ready to bake. Just be sure to bake them within a day or two for the best results.
What can I substitute for ground beef?
You can easily replace the ground beef with ground turkey, chicken, or even a plant-based meat substitute for a healthier or vegetarian version.
How long do they last in the fridge?
Stored in an airtight container, these bombs last for about three days in the fridge. Be sure to consume them before they start losing their freshness.
Can I use different types of cheese?
Definitely! Feel free to experiment with cheese types like Swiss, pepper jack, or even cream cheese for a unique twist on the flavors.
What’s the best way to freeze them?
After baking, allow the bombs to cool completely and then freeze them in a single layer before transferring them to a freezer bag. This prevents them from sticking together.
Conclusion
Garlic Parmesan Cheeseburger Bombs are a delightful way to bring family together, offering delicious flavors and simple preparation. They are comforting, versatile, and incredibly satisfying, making them perfect for any occasion. Whether you’re serving them at a gathering or enjoying a cozy night in, these bombs are sure to be a hit at your dinner table. Try it tonight and let me know how it turned out!
PrintGarlic Parmesan Cheeseburger Bombs

Delicious bundles of dough filled with seasoned ground beef, gooey cheese, and fragrant garlic, perfect for any occasion.
- Prep Time: 10 minutes
- Cook Time: 30 minutes
- Total Time: 40 minutes
- Yield: 4 servings 1x
- Category: Appetizer
- Method: Baking
- Cuisine: American
- Diet: Flexible
Ingredients
- 1 lb ground beef
- 1 cup shredded cheddar cheese
- 1 tbsp minced garlic
- 1 tbsp Parmesan cheese
- 1 can (16 oz) of crescent roll dough
- Salt and pepper to taste
- Optional dipping sauces: Ketchup or mustard
Instructions
- Preheat your oven to 375°F (190°C).
- In a skillet over medium heat, cook the ground beef with minced garlic until browned (6-8 minutes), seasoning with salt and pepper.
- Remove from heat and stir in shredded cheddar and Parmesan until melted.
- Roll out crescent roll dough and separate into triangles.
- Place a tablespoon of beef and cheese mixture in the center of each triangle and fold the dough over the filling, pinching to seal.
- Arrange on a baking tray and bake for 12-15 minutes until golden brown.
- Let cool for 2-3 minutes before serving with dipping sauces.
Notes
For added flavor, customize the filling with onions, jalapeños, or use puff pastry instead of crescent dough.
Nutrition
- Serving Size: 1 bomb
- Calories: 400
- Sugar: 1g
- Sodium: 450mg
- Fat: 20g
- Saturated Fat: 8g
- Unsaturated Fat: 10g
- Trans Fat: 0g
- Carbohydrates: 30g
- Fiber: 1g
- Protein: 25g
- Cholesterol: 60mg