
Mini Cheesecakes: Creamy No-Bake Mini Cheesecakes
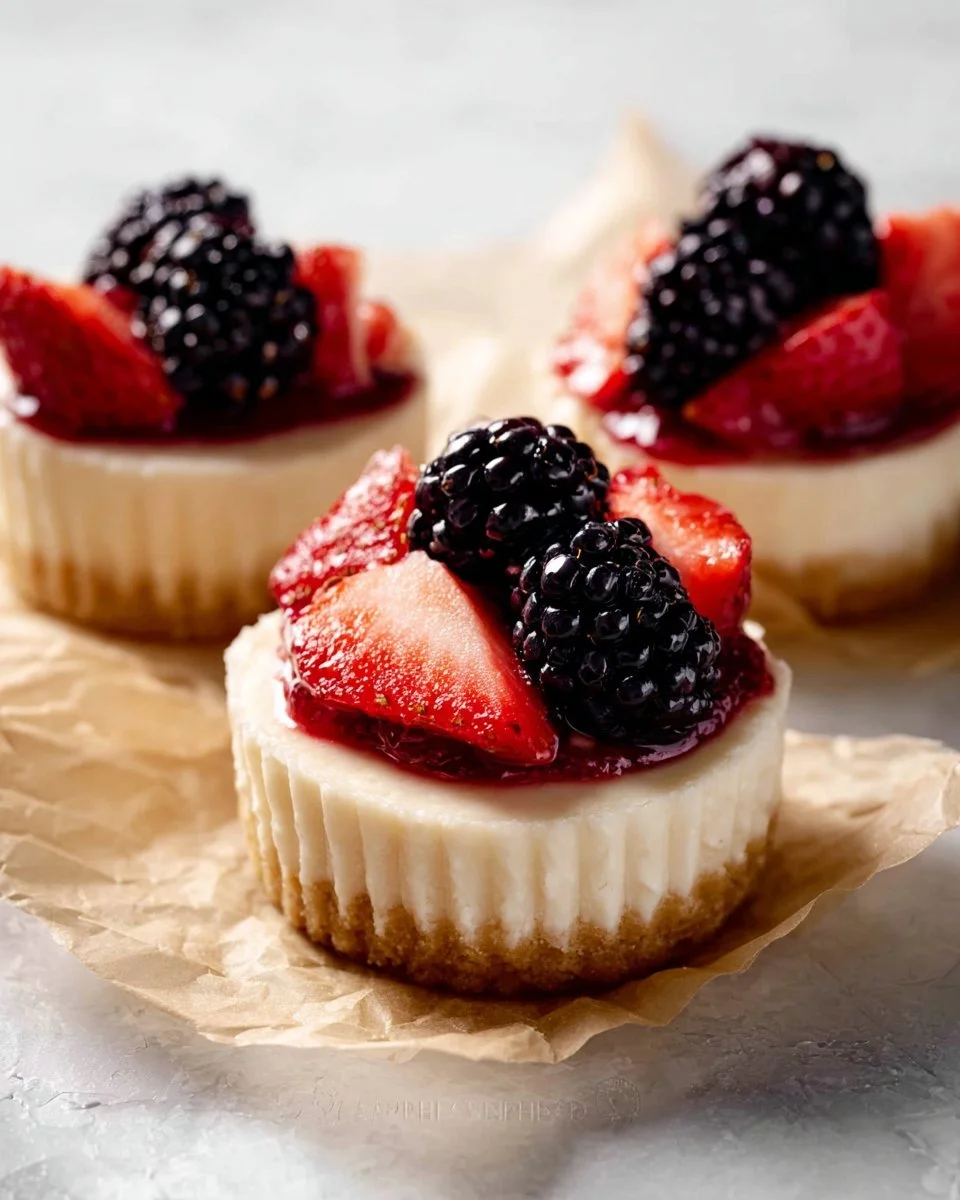
These mini cheesecakes are creamy, silky, and perfectly portioned for parties or a cozy dessert after dinner. The graham cracker crust is sweet and slightly crunchy, while the filling is rich yet lightened by whipped heavy cream. Expect a bright hint of lemon and a warm vanilla aroma that complements the tang from the sour cream or yogurt. These little cheesecakes have a smooth, airy texture that melts on the tongue, and they hold their shape beautifully in a cupcake liner, making them easy to serve.
They are ideal for gatherings, potlucks, or anytime you want an elegant dessert without fuss. If you enjoy playful presentations, check a fun twist like gnome mini cheesecakes for inspiration that makes serving even more festive. Make these ahead and chill, then top just before serving for best texture and appearance.
Ingredients
-
2 cups (240g) graham cracker crumbs, finely ground for an even, sturdy crust.
(Use a food processor or crush in a zip-top bag with a rolling pin.) -
1/3 cup (67g) packed light or dark brown sugar, adds caramel notes and helps bind the crust.
(Dark brown sugar gives a deeper molasses flavor.) -
1/2 cup (113g) unsalted butter, melted, to hold the crust together and add richness.
(Melt and cool slightly so it does not melt the liners.) -
1 cup (240ml) cold heavy cream, whipped to stiff peaks to lighten the filling.
(Chill the bowl and beaters for best results.) -
16 ounces (452g) full-fat brick cream cheese, softened, for a rich, tangy base.
(Room temperature makes it easy to beat smooth.) -
1/3 cup (67g) granulated sugar, sweetens the filling without grittiness.
(Measure by weight for accuracy.) -
2 Tablespoons (30g) sour cream or plain yogurt, adds tang and a silkier texture.
(Sour cream is slightly richer, yogurt is a lighter option.) -
1 teaspoon fresh lemon juice, brightens and balances the sweetness.
(Fresh juice gives the cleanest flavor.) -
1/2 teaspoon pure vanilla extract, rounds the flavor with warm aromatics.
(Use pure extract for best taste.) -
Optional toppings, such as fruit, jam, chocolate shavings, or a dollop of whipped cream, to finish each mini cheesecake.
(Choose toppings to complement the lemon and vanilla.)
For more creative presentations and crust ideas, you might enjoy this playful approach to mini cheesecakes, which shows fun finishes and styling using similar ingredients, at gnome mini cheesecakes.
Step-by-Step Instructions
-
Line pans. Line two standard 12-count muffin pans with cupcake liners so you have 24 cups ready.
Tip: Use sturdy liners for easier removal when chilling. -
Make the crust. In a bowl, combine the graham cracker crumbs, brown sugar, and melted butter. Stir until the mixture resembles wet sand and holds together when pressed.
-
Press crust into liners. Press about 1 to 2 tablespoons of the crust firmly into the bottom of each cupcake liner to form an even crust layer. A small measuring cup or the back of a spoon works well for compacting.
-
(Optional) Bake crusts. If you like a firmer crust, bake the crusts at 350°F (177°C) for 5 minutes. Remove from the oven and cool completely before adding filling.
-
Whip the cream. Chill a mixing bowl and beaters, then whip the cold heavy cream until stiff peaks form. Set the whipped cream aside in the refrigerator.
-
Prepare the cream cheese base. In a separate bowl, beat the softened cream cheese and granulated sugar together until smooth and free of lumps. Add the sour cream or plain yogurt, fresh lemon juice, and pure vanilla extract, and mix until fully combined and silky.
-
Fold in whipped cream. Gently fold the whipped heavy cream into the cream cheese mixture in two or three additions. Fold carefully so you keep the air and light texture.
-
Fill the cups. Spoon or pipe the filling into each prepared crust, filling each cup nearly to the top. Tap the pans gently to settle the filling and remove air pockets.
-
Chill. Refrigerate the mini cheesecakes for at least 3 hours before serving so they set properly. They are best served chilled.
-
Serve. Remove liners or leave them for easy serving, and top each cheesecake with any optional toppings just before serving.
For tips on presentation or piping ideas, try a step-by-step guide that shows filling methods and small finishing touches at gnome mini cheesecakes.
Recipe Details
- Prep Time: 20 minutes.
- Cook Time: 5 minutes optional bake for crusts.
- Total Time: 3 hours 25 minutes including chilling time.
- Servings: 24 mini cheesecakes.
- Calories: Approximately 205 calories per mini cheesecake.
For serving suggestions and portion ideas when entertaining, see creative mini cheesecake displays at gnome mini cheesecakes.
Tips, Storage & Variations
-
Tips: Cool the optional baked crust completely before adding filling to prevent any melting. When folding in whipped cream, use a spatula and lift from the bottom to keep air in the mixture. For cleaner presentation, pipe the filling using a large round tip or a resealable bag.
-
Storage: Store finished mini cheesecakes in an airtight container in the refrigerator for up to 4 days. Keep toppings separate if they are juicy, and add them just before serving.
-
Freezing: Freeze un-topped mini cheesecakes on a baking sheet until solid, then transfer to a sealed freezer container for up to 1 month. Thaw in the refrigerator for several hours before serving. Place parchment between layers to prevent sticking.
-
Flavor variations using only ingredients from this recipe:
- Use dark brown sugar in the crust for a deeper flavor.
- Substitute plain yogurt for the sour cream for a slightly lighter tang.
- Add a tiny extra splash of lemon juice to the filling for a brighter citrus note.
- Top with a spoonful of whipped cream made from the heavy cream and a sprinkle of reserved graham crumbs for texture.
For a visual guide on decorative finishes and fun themes, you can find ideas at gnome mini cheesecakes.
Frequently Asked Questions
-
How long do mini cheesecakes need to chill?
They need at least 3 hours in the refrigerator to set properly. -
Can I use plain yogurt instead of sour cream?
Yes, plain yogurt works and gives a slightly lighter tang. -
Do I have to bake the crusts?
No, baking is optional; it firms the crust and adds a toasty flavor. -
How should I store leftover cheesecakes?
Keep them in an airtight container in the refrigerator for up to 4 days. -
Can I freeze these mini cheesecakes?
Yes, freeze them without toppings for up to 1 month and thaw in the fridge.
People Also Ask
-
What is the best way to get smooth cream cheese filling?
Beat the cream cheese until completely smooth before adding the other ingredients, and use room temperature cream cheese. -
Why is my filling runny after chilling?
It may need more chilling time, or the cream cheese was not fully beaten or was too soft when mixed. -
Can I make these a day ahead?
Yes, they hold well when made a day ahead and chilled overnight. -
How can I prevent cracks in the filling?
These are no-bake and should not crack. Avoid overmixing and use gentle folding when adding whipped cream. -
What liners work best for mini cheesecakes?
Sturdy cupcake liners are best for easy removal, or use silicone liners for reheating or easier release. -
Is it okay to use low-fat cream cheese?
This recipe calls for full-fat brick cream cheese for the best texture and flavor, though low-fat will change richness and setting. -
How do I make a firmer crust without baking?
Press the crust very firmly into the liners and chill the pans before adding filling to help it set. -
Can I double the recipe?
Yes, just multiply the ingredients and use additional muffin pans to accommodate the extra batter.
Conclusion
These Mini Cheesecakes are a simple, elegant dessert that you can prepare ahead and customize with your favorite optional toppings. They balance a sweet, crunchy graham crust with a smooth, airy cream cheese filling that is brightened by lemon and vanilla, and they are perfect for serving at gatherings or enjoying after dinner. For a classic tutorial and more variations, see Mini Cheesecakes (in a Standard Muffin Pan) – Sally’s Baking. For additional mini cheesecake inspiration and finishes, visit Mini Cheesecakes – Live Well Bake Often.
Try the recipe, share your photos, and enjoy a batch of creamy mini treats that are sure to impress.
PrintMini Cheesecakes
Creamy No-Bake Mini Cheesecakes, perfectly portioned for parties or a cozy dessert.
- Prep Time: 20 minutes
- Cook Time: 5 minutes
- Total Time: 205 minutes
- Yield: 24 mini cheesecakes 1x
- Category: Dessert
- Method: No-Bake
- Cuisine: American
- Diet: Vegetarian
Ingredients
- 2 cups (240g) graham cracker crumbs
- 1/3 cup (67g) packed light or dark brown sugar
- 1/2 cup (113g) unsalted butter, melted
- 1 cup (240ml) cold heavy cream, whipped to stiff peaks
- 16 ounces (452g) full-fat brick cream cheese, softened
- 1/3 cup (67g) granulated sugar
- 2 tablespoons (30g) sour cream or plain yogurt
- 1 teaspoon fresh lemon juice
- 1/2 teaspoon pure vanilla extract
- Optional toppings: fruit, jam, chocolate shavings, or whipped cream
Instructions
- Line pans with cupcake liners to prepare 24 cups.
- Make the crust by combining graham cracker crumbs, brown sugar, and melted butter.
- Press about 1 to 2 tablespoons of crust into the bottom of each cupcake liner.
- Optional: Bake the crusts at 350°F (177°C) for 5 minutes, then cool.
- Whip the chilled heavy cream until stiff peaks form.
- Prepare the cream cheese base by beating cream cheese and granulated sugar until smooth.
- Add sour cream, lemon juice, and vanilla extract to the mixture and blend.
- Fold in the whipped cream gently.
- Fill each crust with the cheesecake mixture, tapping to settle.
- Chill mini cheesecakes for at least 3 hours before serving.
- Serve with optional toppings just before enjoyment.
Notes
Cool baked crust completely before adding filling to prevent melting. Store cheesecakes in the refrigerator for up to 4 days.
Nutrition
- Serving Size: 1 mini cheesecake
- Calories: 205
- Sugar: 10g
- Sodium: 200mg
- Fat: 15g
- Saturated Fat: 9g
- Unsaturated Fat: 3g
- Trans Fat: 0g
- Carbohydrates: 23g
- Fiber: 1g
- Protein: 3g
- Cholesterol: 50mg