

Easter Bunny Poke Cake
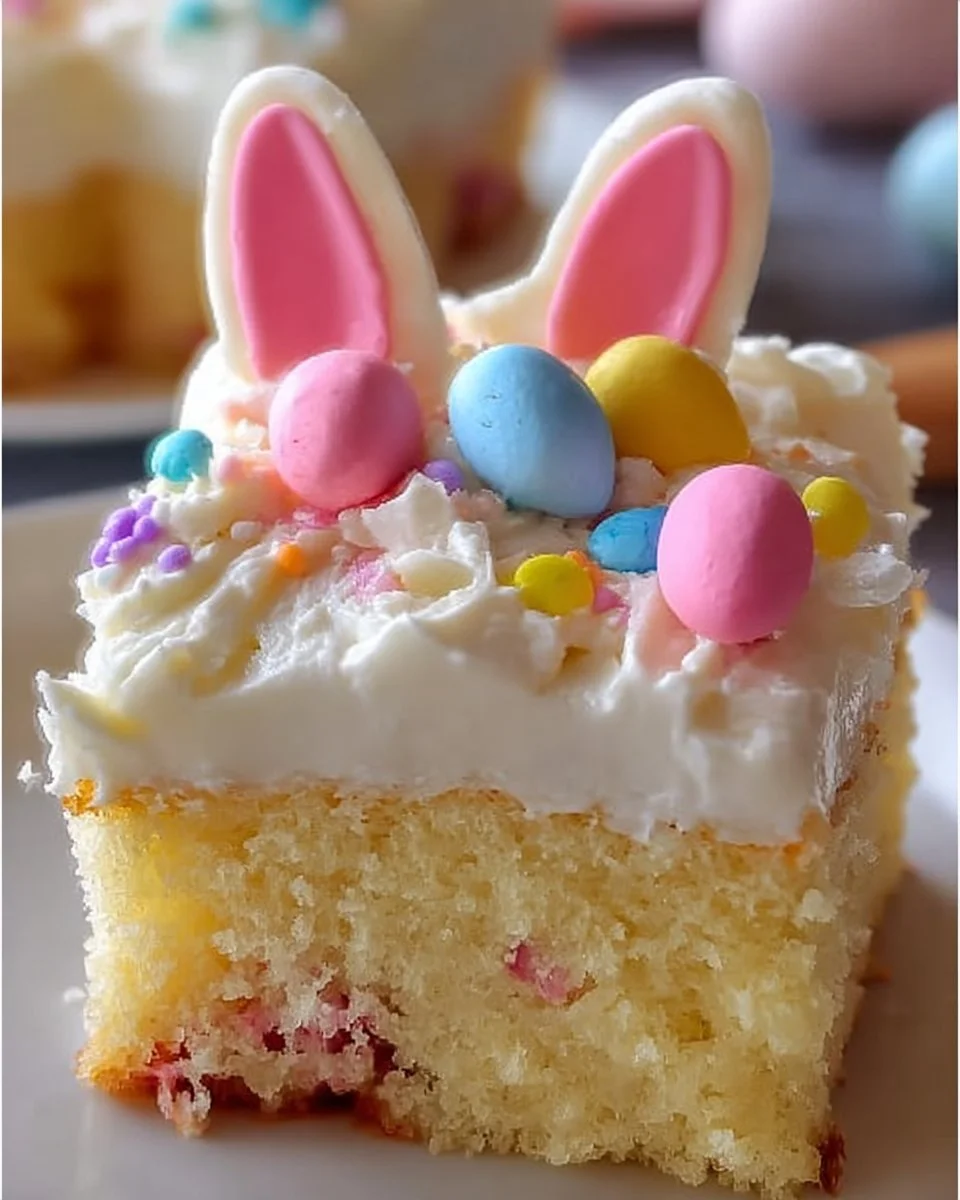
This Easter Bunny Poke Cake is a playful, crowd-pleasing dessert that looks festive and tastes even better. The cake is soft and tender from a classic white or yellow boxed mix, while pockets of creamy vanilla pudding add a cool, custard-like texture in every bite. Topped with fluffy whipped topping and a dusting of pastel shredded coconut, the cake delivers a light, sweet aroma with subtle vanilla and coconut notes. Jelly beans or candy-coated chocolates add a satisfying pop of color and a bit of chew for contrast. It is ideal for holiday potlucks, family gatherings, school parties, or any spring celebration when you want a simple showstopper that feels homemade but comes together quickly. The assembly is fun for kids, and decorative accents like candy eyes or licorice strips let you create a charming bunny face to delight guests.
Ingredients
- 1 box (18.25 oz) white or yellow cake mix, for the base cake. Use whichever flavor you prefer; both bake up light and tender.
- 3 large eggs, to bind the batter and add structure and richness.
- 1 cup water, to hydrate the cake mix and achieve the right batter consistency.
- 1/2 cup vegetable oil, for moisture and a soft crumb.
- 1 package (3.4 oz) instant vanilla pudding mix, adds a creamy vanilla filling that sets quickly.
- 2 cups cold milk, to whisk with the pudding mix so it thickens into a spoonable custard.
- 1 container (8 oz) whipped topping (such as Cool Whip), thawed, for a light, fluffy frosting layer.
- Pastel-colored jelly beans or candy-coated chocolates, for colorful, festive decoration and a sweet chew.
- 1 cup shredded coconut (dyed pink or left white), to create the bunny body texture and add mild coconut flavor.
- Optional: Candy eyes, licorice strips, or other decorations, to craft the bunny face and extra details.
Step-by-step Instructions
- Preheat the oven to 350°F (175°C) and grease a 9×13-inch baking dish. Grease the pan well to prevent sticking.
- In a large bowl, combine the cake mix, 3 large eggs, 1 cup water, and 1/2 cup vegetable oil. Mix until smooth. Use a hand mixer or whisk and scrape the bowl so there are no dry pockets.
- Pour the cake batter into the prepared dish and bake for 25 to 30 minutes or until a toothpick inserted in the center comes out clean. If your oven runs hot, check at 25 minutes.
- Let the cake cool for 10 minutes, then poke holes all over it. Use the handle of a wooden spoon or a large straw for even holes about 1 inch apart.
- In another bowl, whisk the 3.4 oz instant vanilla pudding mix and 2 cups cold milk until it thickens. Whisk for about 2 minutes until smooth and slightly thick.
- Pour the pudding over the cake, making sure it fills the holes. Pour slowly and spoon into any spots that need more pudding coverage.
- Refrigerate for 1 hour to allow the pudding to set and soak into the cake. Cover the dish lightly with plastic wrap if desired.
- Spread the 8 oz thawed whipped topping over the cake and decorate with pastel-colored jelly beans or candy-coated chocolates, shredded coconut, and optional candy eyes, licorice strips, or other decorations. Press coconut gently into the topping to create the bunny body.
- Chill for another 30 minutes before slicing and serving. This final chill firms the topping and makes slicing cleaner.
Recipe Details
- Prep Time: 15 minutes
- Cook Time: 30 minutes
- Total Time: 2 hours 25 minutes (includes chilling and setting time)
- Servings: 12 (9×13-inch pan)
- Calories: Approximately 370 calories per serving
Tips, Storage & Variations
- Tips
- Let the cake cool slightly before poking so the holes hold shape without tearing the crumb.
- Use a long-handled spoon or straw to make consistent holes; this helps the pudding distribute evenly.
- If your whipped topping is still slightly frozen, let it thaw fully for easiest spreading.
- Storage
- Store covered in the refrigerator for up to 3 days. Keep decorations fresh by adding delicate candy eyes just before serving if you expect moisture to affect them.
- For best texture, consume within 48 hours.
- Freezing
- You can freeze the entire cake once assembled without delicate decorations. Wrap tightly in plastic wrap and aluminum foil and freeze up to 1 month. Thaw in the refrigerator overnight, then add fresh decorations before serving.
- Variations using existing ingredients only
- Use the white cake mix for a milder vanilla flavor or the yellow cake mix for a slightly richer, buttery note.
- Swap pastel-colored jelly beans for candy-coated chocolates for a crunchier candy bite.
- Leave the shredded coconut white for a classic look, or dye it pink for a rosy bunny body.
FAQ
Q: Can I make this cake ahead of time?
A: Yes, assemble and refrigerate up to 2 days ahead. Add fragile decorations just before serving.
Q: Do the pudding holes need to be deep?
A: Make holes about 1 inch deep and 1 inch apart so pudding can soak into the cake without cutting through.
Q: Can I use homemade pudding instead of instant?
A: You can, but instant pudding sets faster and is the intended texture for this poke method.
Q: Is it necessary to chill the cake after adding pudding?
A: Yes, chilling for at least 1 hour helps the pudding set and keep the cake moist.
Q: How do I keep the coconut from turning soggy?
A: Press coconut into the whipped topping just before serving, and store the cake chilled until ready to present.
Q: Can I make the cake in a different pan size?
A: A 9×13-inch pan is recommended for volume and baking time. Using a smaller pan may change baking time and pudding distribution.
People Also Ask
Q: What is a poke cake?
A: A poke cake is a baked cake with holes poked into the top that are filled with pudding, gelatin, or sauce for added moisture and flavor.
Q: How long does poke cake last in the fridge?
A: Properly stored, poke cake lasts about 3 days refrigerated.
Q: Can I use low-fat milk for the pudding?
A: Yes, low-fat milk will work, though the pudding may be slightly less rich.
Q: Will the cake become soggy from the pudding?
A: The pudding should soak into the cake and create a moist, custardy texture rather than sogginess if chilled properly.
Q: Should I cover the cake while chilling?
A: Cover lightly to prevent condensation on decorations; remove cover before serving for best presentation.
Q: Can I make individual portions of this poke cake?
A: You can assemble in smaller dishes or ramekins, but adjust chilling time for smaller volumes.
Q: Are jelly beans the best candy for decorating?
A: Jelly beans give a festive look and chewy texture, but candy-coated chocolates work well too for a crunchier bite.
Conclusion
This Easter Bunny Poke Cake is an easy, festive dessert that brings spring color and playful charm to any table. It combines a fluffy cake base, creamy vanilla pockets, and light whipped topping, all dressed up with pastel candies and coconut to create an adorable bunny centerpiece. If you want more inspiration for seasonal poke cakes or decorating ideas, see this version at Easter Poke Cake – Wishes and Dishes and another take at Easter Poke Cake – OMG Chocolate Desserts. Try it, share photos with friends, and enjoy a sweet, easy holiday treat.
PrintEaster Bunny Poke Cake

A playful, crowd-pleasing dessert that combines a fluffy cake base with creamy vanilla pudding, adorned with pastel candies and coconut for a festive look.
- Prep Time: 15 minutes
- Cook Time: 30 minutes
- Total Time: 125 minutes
- Yield: 12 servings 1x
- Category: Dessert
- Method: Baking
- Cuisine: American
- Diet: Vegetarian
Ingredients
- 1 box (18.25 oz) white or yellow cake mix
- 3 large eggs
- 1 cup water
- 1/2 cup vegetable oil
- 1 package (3.4 oz) instant vanilla pudding mix
- 2 cups cold milk
- 1 container (8 oz) whipped topping, thawed
- Pastel-colored jelly beans or candy-coated chocolates
- 1 cup shredded coconut (dyed pink or left white)
- Optional: Candy eyes, licorice strips, or other decorations
Instructions
- Preheat the oven to 350°F (175°C) and grease a 9×13-inch baking dish.
- Combine the cake mix, eggs, water, and vegetable oil in a large bowl. Mix until smooth.
- Pour the cake batter into the prepared dish and bake for 25 to 30 minutes or until a toothpick comes out clean.
- Let the cake cool for 10 minutes, then poke holes all over it.
- Whisk the vanilla pudding mix and cold milk in another bowl until thick.
- Pour the pudding over the cake, filling the holes.
- Refrigerate for 1 hour to let the pudding set.
- Spread the whipped topping over the cake and decorate with jelly beans, shredded coconut, and optional decorations.
- Chill for another 30 minutes before serving.
Notes
Let the cake cool slightly before poking holes to prevent tearing. Store covered in the refrigerator for up to 3 days.
Nutrition
- Serving Size: 1 serving
- Calories: 370
- Sugar: 28g
- Sodium: 400mg
- Fat: 12g
- Saturated Fat: 4g
- Unsaturated Fat: 6g
- Trans Fat: 0g
- Carbohydrates: 60g
- Fiber: 0g
- Protein: 5g
- Cholesterol: 30mg